
Validating Naming Conventions in Power Apps
Sep 26, 2023 • 8 • 1497
Table of contents
Why naming conventions
One of the main advices while creating Power Apps canvas apps is to use proper naming conventions for all the components you’re using. Not only to support readability for your own usage, also for supportability. Probably it’s not too difficult to convince someone of its importance, while in the hustle and bustle of everyday life, you don’t give it priority always.
Some advantages:
- Consistency; so you can better focus on the solution
- Maintainability; everyone has the same language and can therefore navigate through a solution more easily
- Interchangeability; copying, changing and maintaining solutions can be done by multiple people
This blog gives and explains a Powershell script which you can use to validate naming convention in your Power App.
Determine Standards
First of all you need to determine the standards you want to use. A good starting point is the one Matthew Devaney created: Power Apps Standards: Naming Conventions .
Preparation
Determine naming conventions in JSON format and store it in a separate file. When Microsoft adds new components it’s easily to maintain and add the naming conventions for the newly added component.
Download an example file here.
[
    {
        "Control": "button",
        "Naming": "btn"
    },
    {
        "Control": "checkbox",
        "Naming": "chk"
    },
    {
        "Control": "gallery",
        "Naming": "gal"
    },
    {
        "Control": "label",
        "Naming": "lbl"
    }
]
Step by step
Powershell to the rescue to validate the naming conventions! The following high level steps needs to be done:
- Export solution
- Unpack solution
- Understand structure and files
- Read the files
- Apply naming conventions validation
- Reporting
The script is explained in details below. You can download a full version of the script: Download Power Apps Naming Conventions Validation script.
1. Export solution
Install-Module -Name powershell-yaml -Force -Repository PSGallery -Scope CurrentUser

$environment = "" #Name of your environment
$sourceUrl = "https://<<unique name>>.crm4.dynamics.com/" #Instance url of your environment (can be found in sessions details)
$sourceConnectionName = "ConnectionName" #Name of your connection
$solutionName = "SolutionName" #use Internal Name of your solution

$dateTime = Get-Date -Format "yyyy-MM-dd-HHmm"
$destinationFolder = "C:\temp\$($dateTime)-$($solutionName)"
$reportErrorLevel = $true #If false: all logging will be stored in the output CSV
$namingConventionsPath = "C:\temp\NamingConventionsJsonObject.json" ## Location of JSON file which contains naming conventions

#namingconventions
$table = Get-Content -Path $namingConventionsPath -Raw | ConvertFrom-Json

pac auth create --url $sourceURL --name $sourceConnectionName

pac solution export --path "$($destinationFolder).zip" --name $solutionName --managed false --include general
2. Unpack solution
The part in the script in which you can unpack the zip file.
pac solution unpack --zipfile "$($destinationFolder).zip" --folder "$($destinationFolder)\." --processCanvasApps --allowWrite
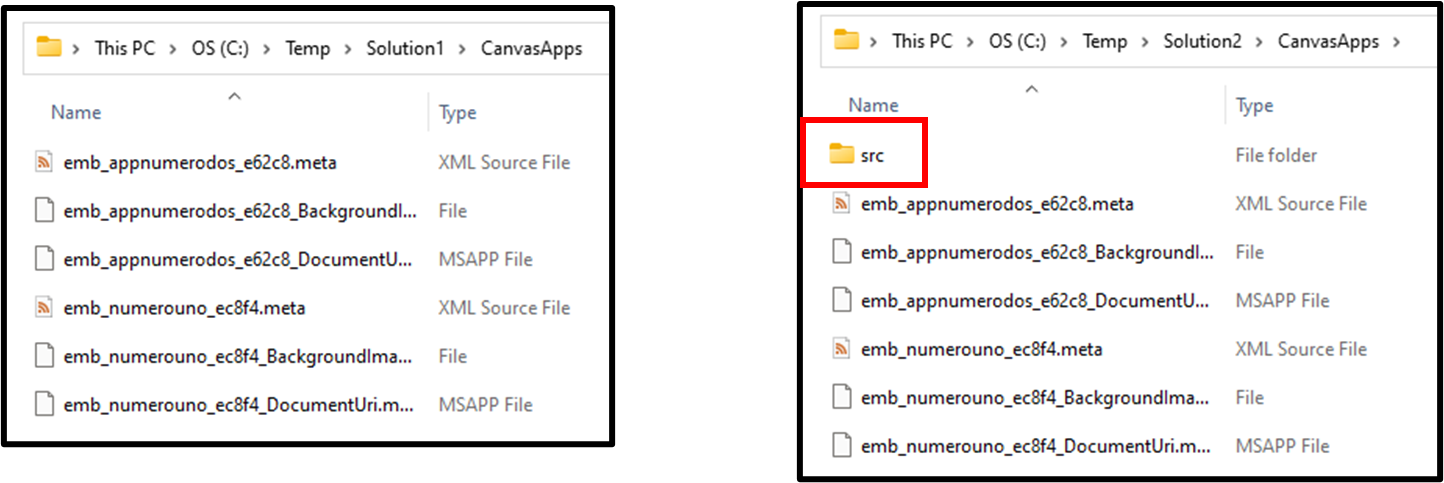
An important parameter to set is the --processCanvasApps

The screenshot on the left is an unpack without --processCanvasApps and the one on the right side is with using --processCanvasApps
3. Understand structure and files
It’s good to understand a bit of the file structure inside the zip file.
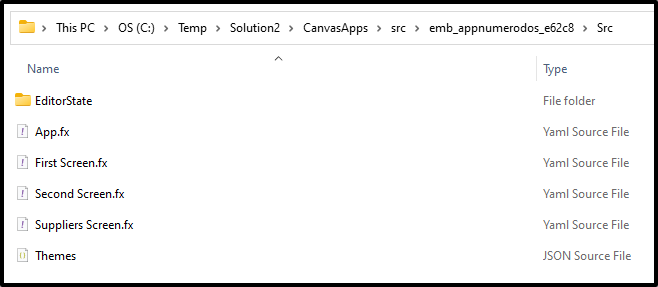
Structure contains a couple of folders and per app their is a folder name ‘Src’ in which the Yaml Source File per screen can be found:
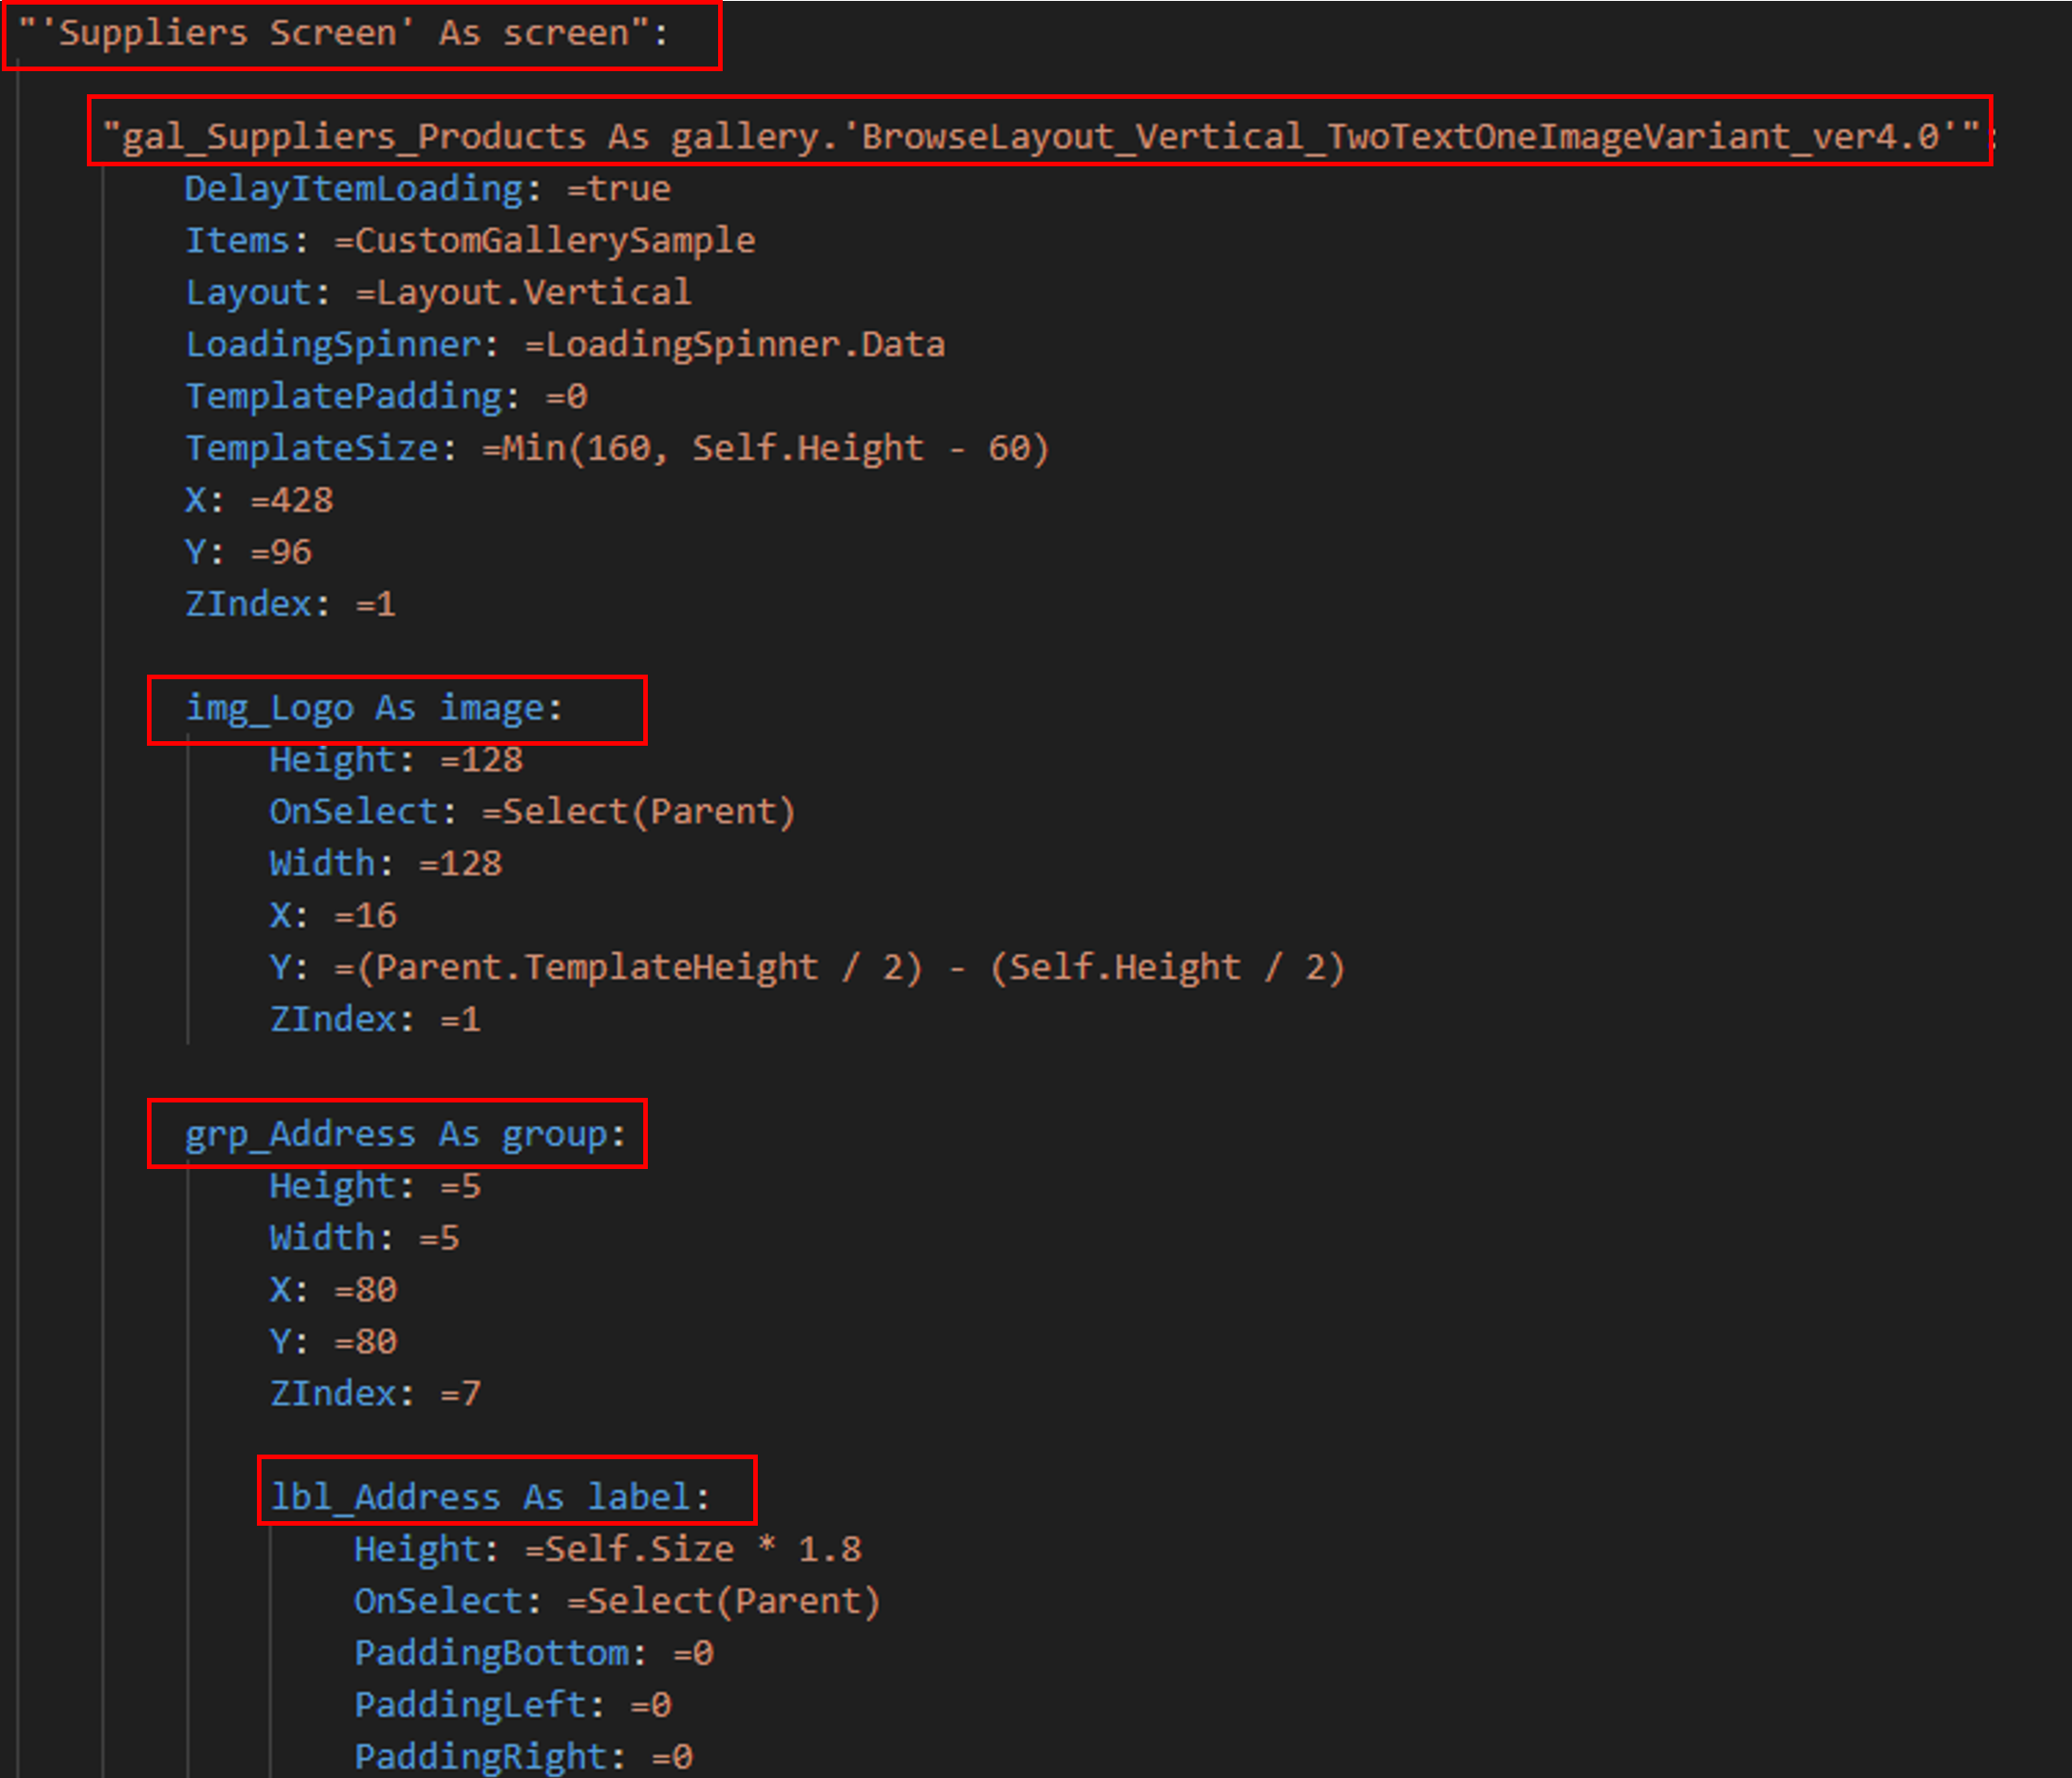
All Yaml files have the same structure in which it starts with the name of the screen and next all controls are mentioned including their settings.
The mentioning of the controls is always in the structure ‘«name of control determined in the app»’ followed by ‘As’ and the type of the control.
4. Read the files
Back to the Powershell script in which all available controls inside all the Yaml files needs to be retrieved.
$canvasApps = Get-ChildItem -Path "$($destinationFolder)\." -Filter *.msapp -Recurse -File -Name
$summary = @()
$outputCSV = @()

foreach ($canvasApp in $canvasApps) {
    $internalAppName = $canvasApp.Split('\')[-1].replace('_DocumentUri.msapp', '')
    $displayName = (Get-Content -Path "$($destinationFolder)\CanvasApps\$($internalAppName).meta.xml" -Raw) | Select-Xml -XPath "/CanvasApp/DisplayName" | Select-Object -ExpandProperty Node | Select-Object -ExpandProperty "#text"

    $sourceFiles = Get-ChildItem -Path "$($destinationFolder)\CanvasApps\Src\$($internalAppName)\Src" -Filter *.yaml -Recurse -File -Name
    $output = @()

    # Get all Yaml files of the app and get all the controls with there name and type
    foreach ($sourceFile in $sourceFiles) {
        Write-output "$($sourceFile)"
        $fileContent = Get-Content "$($destinationFolder)\CanvasApps\Src\$($internalAppName)\Src\$($sourceFile)" -Raw
        $jsonObject = ConvertFrom-Yaml -Yaml $fileContent

        function LoopJson($jsonObject, $screen, $path, $loginPath) {
            $item = @()
            foreach ($key in $jsonObject.Keys) {
                if ($key.Contains("As")) {
                    $name = $key.Split(' As ')[0]
                    $type = $key.Split(' As ')[1]
                    Write-Host "$($name)"
                    $item += @{
                        Name   = $name
                        Type   = $type.split('.')[0]
                        Screen = $screen
                        Path   = $path
                    }
                    $item += (LoopJson $jsonObject.$key $screen $(if (!$loginPath) { $path } elseif ($path -eq "") { "$name" } else { "$path/$name" }) $true)
                }
            }
            return $item
        }
        $outputScreen = LoopJson $jsonObject $sourceFile.Split('.fx.yaml')[0] ""
        $output += $outputScreen
    }
Explanation of the steps performed in the above part of the script. First step is to determine the Canvas Apps inside the solution by filtering on ‘*.msapp’ files. Followed by looping through all the Yaml files available in side the Canvas Apps Src folder. Example output of the variable $sourceFiles:
App.fx.yaml
Loading Screen.fx.yaml
Navigation Screen.fx.yaml
Random Screen.fx.yaml
The Yaml files needs to be converted into a JSON object, so the content of the files can be looped through, to retrieve all controls.
Example output of $jsonObject:

In the Canvas Apps you can create nested elements (screen -> gallery -> group -> component), so the function which loops to all elements needs to able to detect all controls no matter if they are nested or not.
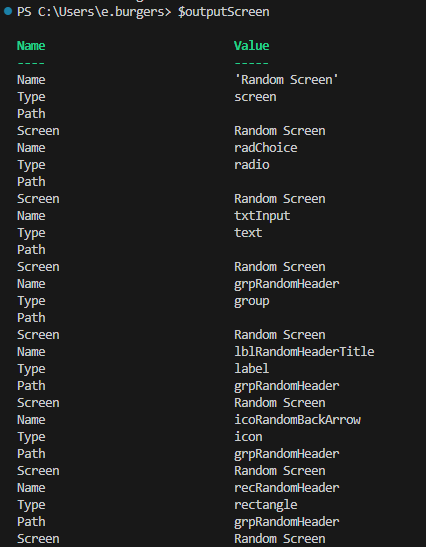
Example of output screen, so all controls are mentioned including their name, type, path and on which screen they are.
5. Apply naming conventions validation
Next step is to test if all controls match the given naming conventions. For all controls the naming convention will be looked up inside the naming convention table.
So for example for the item of type dropdown the $naming will be set to ‘drp’ and the validation will be made using -cmatch to validate the given name with prefix it should be start with.
The output of the validation is written to the console and when the name doesn’t match the wrong counter will be increased by one. In order to able to calculate a total score per app.
Next to that a variable is filled with the details of the validation as a preparation for the reporting part.
 $wrong = 0
    # Test if all controls match the given namingconventions
    foreach ($item in $output) {

        $naming = $table | Where-Object { $_.Control -eq $item.Type } | Select-Object -ExpandProperty Naming
        if ($naming -and $item.Name -cmatch "^$naming") {
            $message = "Control '$($item.Name)' matches type '$($item.Type)' with naming convention '$($naming)'."
            $status = "Correct"
            Write-Host "✅ " $message
        }
        elseif ($item.Type -eq "screen" -and $item.Name -cmatch 'Screen$') {
            $message = "Screen $($item.Name) matches naming convention."
            $status = "Correct"
            Write-Host "✅ " $message
        }
        elseif ($item.Type -eq "screen" -and $item.Name -notmatch 'Screen$') {
            $message = "Screen $($item.Name) doesn't match naming convention."
            $status = "Error"
            Write-Host "❌ " $message -ForeGroundColor Blue
        }
        else {
            $message = "Control '$($item.Name)' with type '$($item.Type)' does not match naming convention, Name should start with '$($naming)' on Screen named '$($item.Screen)' $(if ( $item.Path -ne '') { "in element '$($item.Path)'"})"
            $status = "Error"
            Write-Host "❌ " $message -ForegroundColor Blue
            $wrong++
        }

        $outputCSV += [ordered] @{
            Environment = $environment
            Solution    = $solutionName
            App         = $displayName
            Screen      = $item.Screen
            Path        = $item.Path
            Control     = $item.Name
            Type        = $item.Type
            Status      = $status
            Message     = $message
        }
    }

    $calc = 100 - (($($wrong) / $($output.Count)) * 100)
    $score = [math]::Round($calc, 1)
The conclusion of the validation is written into the terminal.
    # Write conclusion to terminal
    Write-Host "The score of the app $($displayName) in solution $($solutionName) is " -NoNewline
    if ($score -ge 90) {
        Write-Host "$($score)% `u{1F600}" -ForegroundColor Green -NoNewline
        $summary += "The score of the app $($displayName) is $($score)% `u{1F600}. $($wrong) out of $($output.Count) doesn't match the naming conventions.>"
    }
    else {
        Write-Host "$($score)% `u{1F622}" -ForegroundColor Red -NoNewline
        $summary += "The score of the app $($displayName) is $($score)% `u{1F622}. $($wrong) out of $($output.Count) doesn't match the naming conventions.>"
    }
    Write-Host ": $($wrong) out of $($output.Count) doesn't match the naming conventions."

}
To improve the readability in the terminal colors and emoticons are used.

6. Reporting
Reporting can be done in many different ways. To validate the process of the script the terminal is used to show the outcome and next to that the details of the outcome will be export into an Excel file as well. Based on the variable ($reportErrorLevel) set in the beginning all output is exported in the Excel or only the controls which didn’t match naming convention.
# The summary of the results of all the apps available in the solution
Write-Host "`n Summary of solution $($solutionName):" -ForegroundColor Magenta
$summaryLines = $summary.split('>').Trim()
foreach ($summaryLine in $summaryLines) {
    Write-Host $summaryLine
}
$sortedOutputCsv = $outputCSV | Sort-Object { $_.Environment }, { $_.Solution }, { $_.App }, { $_.Status }
if ($reportErrorLevel) {
    $filteredOutputCSV = $sortedOutputCsv | Where-Object { $_.Status -eq "Error" }
    $filteredOutputCSV | Export-Csv -Path "C:\temp\$($dateTime)$($solutionName).csv" -NoTypeInformation
}
else {
    $sortedOutputCsv | Export-Csv -Path "C:\temp\$($dateTime)$($solutionName).csv" -NoTypeInformation
}
Ideas
In this version of the script only the prefix of the components is validated. Some ideas to expand the script:
- Length of component names
- Copy of controls _0..99
- Quantity of controls on a single screen